TheNiels17 has made a fantastic automated warehouse system.
There are 9 bays, each identified by a 3x3 matrix. Each is identified by a 2 colour combination, so Blue:Green is row 1:column 2, Yellow:Green is row 3, column 2 etc
By assembling a little 'swipe' card with the various colours,you can tell the robot what space you are referring to. You can also tell the robot if it needs to place the 'palette' (white code) or pick the palette (black) code.
So a Green:White:Yellow swipe means - Place the palette at location 2:3
and a Yellow:Black:Blue swipe means - Pick the palette from location 3:1
Of course he's implemented error checking so you can place a palette in an occupied space and you pick a palette if there is nothing there in the first place. Just totop it all off, there is a random function to place a palette in a random, unoccupied spot.
If this didn't make sense, watch the video, it does a far better job of demonstrating it than my description :)
Thursday, September 29, 2011
Wednesday, September 28, 2011
Sumo rings... how to build
I've helped out occasionally at a school with LEGO robotics, and the teacher asked me today for instructions on how to make her own Sumo ring. After typing them up... I realized I don't think I'd ever put them out there "in the wild" so to speak, for others to use. So, here's a copy of the instructions for those who would like to make a reasonably cheap but professional-looking LEGO sumo ring... and if you make it out of melamine, maybe even a more interesting "test environment" as well. Share and enjoy.
=====
> Do you happen to have a list of supplies needed?
Nope... so let's make up a recipe and parts list on the spot :)
A lot of people make a sumo ring out of plywood (often 1/4" or more) supported off the floor with 2x4's or something similar. That's really heavy, and really needs sanding to produce a smooth surface, and can warp when wet, needs a lot of paint, etc. So here's my version.
Materials:
• A 1/4" thick, 4x4 sheet of MDF board (also called "Hardboard"). This is inexpensive, and already has smooth, finished surfaces. It's also not terribly strong and would not support itself well (a good thing). See possible alternative at the end.
• A square of 4x4, 4" thick styrofoam insulation sheeting. Very light, fairly cheap, and can be cut with a hot-wire cutter (can be picked up at a craft store for a few bucks) nice & smooth.
• Flat white & flat black spray-paint.
Tools:
• Saw to cut MDF board (jigsaw works well, but you have to keep the board supported when cutting it)
• Hot-wire cutter (to cut foam board)
• Painter's masking tape (wide, 2" wide if possible)
• String.
Procedure:
1) Stretch string from corner to corner on 4x4 MDF board, marking where it falls across the middle of the board (do that twice, once from top-left to bottom-right, once from top-right to bottom-left). Where the two diagonal lines cross is the middle of the 4x4 sheet.
2) Pin or hold one end of the string to this center point, and tightly hold or wrap a pencil in the strong 2' away. You now have a great big compass to draw a 4' diameter circle. Note: the lower stretch the string is, the better. Upholstery thread is actually really good for this if you have some (stuff is strong and nearly zero stretch). A survey tape works too (eh, I'm a caver, I actually have this stuff lying around).
3) Use the makeshift compass to mark out a really big circle, and cut it out. You might want to sand the cut edges of the board to round them just a bit and take off and rough edges.
4) Lay the 4' diameter circle in the middle of the 4x4 foam board, and trace the edges. You now have a marked circle of foam board you can cut out (using the hot-wire cutter for the final shaping) that can be slid under the ring to raise it a uniform 4", but is really really light so it's easy to transport. Also, since it is rigid and supports the entire surface of the ring, the somewhat floppy MDF board isn't a problem... in fact if it warps a little, just laying it flat usually solves the problem (the ring I have is about 6 years old, and has been sitting on edge in my basement most of that time... but is nice and flat when I lay it down).
5) Spray-paint the outer 3" or so of one side of the MDF ring flat white. Don't worry about the inner edge being irregular, just make sure the outer 2" at least is a nice uniform flat white. MDF board takes paint well, and probably a couple of coats is all you need.
6) Once the white outer edge is completely dry, mask off the outer 2" completely with painter's tape. If the tape is 2" wide, this is really easy to do with overlapping pieces. Make sure the tape seals down to the white along the inner edge.
7) With the outer 2" of already white ring completely protected, spray-paint the entire inside of the ring flat black (again, it might take a couple of coats, but MDF takes paint well). Let this dry completely.
8) Remove the masking tape. You should have a 2" white boarder around an otherwise black circle.
Notes:
• For reasons I've never ever understood, most on-line version of these instructions I've encountered suggests you paint the black first, then mask off and try to paint the edge. I've no idea why, since that means a heck of a lot more white paint to try to completely cover the black paint at the edge you are overspraying, or a rather non-uniform surface. The method above works, and takes a minimum of paint and effort... and it's a lot easier to make a uniform painters tape edge when masking the outside of a curve.
• Since both MDF/Hardboard and the foam insulation usually come in 4x8 sheets, it's actually normally better to make two of these rings at the same time - you're likely to end up with the materials for it anyway. And storing two rings really doesn't take up much more space than one (both rings together are just under 9" thick... you can tuck them behind a file cabinet or along a wall).
• I originally used spray glue to glue the MDF ring to the foam. Don't. The glue eventually fails, and if it's not glued then if & when the foam gets too abused, replacing it is just cutting another piece. The glue takes away flexibility (see below for an idea perfect for teaching settings, that requires "flipping the board"), fails eventually, and really doesn't make it any easier to set up. This also means that if you don't like your robots falling the catastrophic 4" to the floor when they are pushed off the ring... you just slide the foam out. Or, if you are a glutton for punishment, slide a couple of more pieces in there so that the loosing robot takes a 1' fall :)
• Instead of MDF, a possible alternative I've thought of but not tried is white melamine board. It's the same stuff, with a plastic coating on one side for dry erase markers, and not much different in price. If you paint the "back" side into a sumo ring, you still have the big round "front" melamine side that you can draw on with dry-erase markers. It would be good for simple line following courses, or making robots that can draw with dry-erase markers (a lot of fun, actually... one robot can draw a line, while another tries to follow it at the same time for example. The accumulation of trails starts working like an ant colony, and has some interesting "emergent" behavior aspects). My original thought was to just use the white side to start the sumo ring, in place of a painted white edge, but I would not recommend that. The black paint is unlikely to stick well to the melamine, and the friction between the smooth untreated melamine surface and the black spray-painted surface would be significantly different, which isn't something you want either... not to mention what you'd save on not using white paint you'd probably more than outspend on the multiple layers of black painted needed to "black out" all that white melamine.
--
Brian Davis
Tuesday, September 27, 2011
RoboCup Junior Australian Championships
I've just returned home from Hobart, Tasmania where we held the National Championships for RoboCup Junior. Whilst not strictly a LEGO competition, we see a very large proportion of NXT robots, as it is one of the easiest ways for a school to get started.
As usual I got too involved with everything that was happening and didn't get any good pics, but Rob Torok did and posted them in a Picasweb Album.


I've put together a longer post over at www.damienkee.com as well as a couple of short videos of the weekend.
As usual I got too involved with everything that was happening and didn't get any good pics, but Rob Torok did and posted them in a Picasweb Album.
 |
| photos by Rob Torok |


I've put together a longer post over at www.damienkee.com as well as a couple of short videos of the weekend.
Danny's & Xander's OMNIBOT
Time ago, starting from the omnidirectional robots design by Xander Soldaat, I built Omnibot, yet another Killough platform. This can be built with just one NXT 2.0 set (you will have just one sonar). Check out the short demo video below.
Instructions and details available on Danny's MINDSTORMS page.
The software is released as part of the OPEN SOURCE LejOS project.
Instructions and details available on Danny's MINDSTORMS page.
The software is released as part of the OPEN SOURCE LejOS project.
Monday, September 26, 2011
Ultrasonic Sensor Exposed
Xander over at Bot Bench has decided to take to another sensor with his sharp knife, in this case the Ultrasonic Sensor.
Some great photos and a nice writeup but alas no hidden twist like the Colour Sensor

Some great photos and a nice writeup but alas no hidden twist like the Colour Sensor
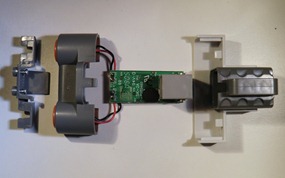
See all the gory details here: http://botbench.com/blog/2011/09/21/exposed-lego-ultrasonic-sensor/
RobotC 3.03 update
Carnegie Mellon's Robotics Academy group have just release an update to the latest version on RobotC.
Nothing major it seems, mainly bug fixes etc but if you're running it, it doesn't hurt to have the latest version.
Click here for the latest download.

via: http://botbench.com/blog/2011/09/26/robotc-3-03-available-for-download-now/
Nothing major it seems, mainly bug fixes etc but if you're running it, it doesn't hurt to have the latest version.
Click here for the latest download.

via: http://botbench.com/blog/2011/09/26/robotc-3-03-available-for-download-now/
Saturday, September 24, 2011
PackBot - Deja Vu all over again
A long time ago (back in Jan 2007) I posted about a robot I had built based on iRobot's Packbot. This morning, I received this wonderful picture. It shows LNE/Packbot next to a military Packbot. Which is just... well, really cool.

Let's just soak in that picture for a moment.
OK, moment's over.
However there's more to this picture than a fun (& really really old... more on that in a minute) robot. This robot isn't mine. I've never touched it, or even seen it in person. It was built by Joe Meno (who writes Brickjournal), using on-line plans I put up on Bricklink. He was having trouble programming it, which he mentioned on Facebook, and we then started emailing back and forth, trading NXT-G programs via YouSendIt. He had to leave for the event he was displaying this at before we were finished, so a portion of this conversation and troubleshooting was done while he was literally on the road. He wanted to show this to some of the folks that work with the real thing, and I couldn't be more happy about that.
The robot cost about $200 in hardware (the LEGO one... you don't want to know what its big brother behind it costs). The fact that I now, finally, years later have a picture with Packbot next to its inspiration is worth far more to me. The fact that all this was done remotely, using commonly available and free tools on-line, in a collaborative process with other AFoLs... is, as they say, priceless. This could have been done with NXC instead of NXT-G, or using plans generated in LCAD or LDD, and presented on-line at Flickr or NXTLog or MindBoards, and the communication could have been via Skype, Google Wave, or community-wide at MindBoards forums or any number of other mechanisms. Joe even mentioned how impressed he was with the way I routed torque through the center of the large Technic turntable to power the "Flipper" treads... which is a trick I was inspired on due to another AFoL, the remarkable Jennifer Clark, who was posting LEGO models of construction vehicles so realistic (in both form & function) that they might as well have been the real things. So this is a collaboration spanning multiple people and multiple years (decades!).
On a slightly different note, this has been a remarkably long-lived robot for me. While testing a program for Joe (the wonders of LEGO... commonly available identical HW platforms are really useful), I pulled out my version of LNE/Packbot which dates back to mid 2007. So it's a LEGO robot that has not had any* parts replaced or changed in at least four years, having been shown for multiple hours on multiple days at various Brickworld events, tested and played with at home, and "torture tested" outdoors in sand, grass, snow, and ice. The motors have never been changed out... yet with all this use (& abuse), it is still running and working hard. LEGO is great for prototyping. And, evidently, for a whole lot more.
Wednesday, September 21, 2011
Calling all LEGO MINDSTORMS NXT Fans near NY!
 From the MINDSTORMS website:
"If you own a LEGO® MINDSTORMS® NXT robot, if you live in the area of New Jersey/New York City, USA, and if you are willing (and if your parents say it is ok) for you to help us with some product testing in early October, ask your parents to download and complete the attached form, and send it back to us. Once we receive the signed form from your parents, you may be contacted by a representative from the company, that conduct the focus group for the LEGO Group. If you are chosen, we may end up having you join us to help with some consumer product testing."
More details: http://mindstorms.lego.com/en-us/News/ReadMore/Default.aspx?id=320866
Good luck!
Richard
Tuesday, September 20, 2011
RoboCup Junior Dance team
I love this photo taken from the recent RoboCup Junior Queensland competition. This was a dance team setting up their backdrop which had some robotic features to it. The leaves moved in time with the music and I think there was a koala climbing up and down a tree.
However, the best part in my opinion are the notes scribbled on the back (away from the audience) to give them prompts and 'debugging' clues. I love the "Is the sign caught?? Tree leaves" :D

However, the best part in my opinion are the notes scribbled on the back (away from the audience) to give them prompts and 'debugging' clues. I love the "Is the sign caught?? Tree leaves" :D
photo : University of Queensland - Tom Nelson
Automating testing of an iPad App
Not exactly NXT, but it's younger sibling the RCX (who remembers those?)
These guys needed to test their iPad app by taking 10,000 photos. Either it's an *incredibly* boring job, or you build a robot to do it for you :)
Simple but effective!
More info from their website - http://lab.pheromone.ca/2011/08/30/the-art-of-automation/
These guys needed to test their iPad app by taking 10,000 photos. Either it's an *incredibly* boring job, or you build a robot to do it for you :)
Simple but effective!
More info from their website - http://lab.pheromone.ca/2011/08/30/the-art-of-automation/
Monday, September 19, 2011
NXT and the dGPS sensor
Rob Torok has just posted a great run down of his use of the Dexter Industries dGPS sensor.
Using LabView he set up a datalogging program, sampling once every 10 seconds for 10 minutes on his daily jog.

Click through for all the details - http://robtorok.blogspot.com/2011/09/my-new-gps-unit.html
Using LabView he set up a datalogging program, sampling once every 10 seconds for 10 minutes on his daily jog.
Click through for all the details - http://robtorok.blogspot.com/2011/09/my-new-gps-unit.html
Sunday, September 18, 2011
Interfacing Android with LEGO NXT: Compass
Here is another proof of concept I did to show Bluetooth communication between Android phone and NXT. I used the accelerometer and magnetic field sensors on the Android phone to calculate its compass heading, and used Bluetooth to send that information to the NXT. While this is not as stable as Brian Davis' Jenn Too, mostly due to magnetic interference from the NXT messing with the compass, it definitely shows the potential Android phones have acting as on-board sensors for autonomous robots.
Richard
Saturday, September 17, 2011
Color Sensor Exposed
Xander over at BotBench has a great post on the inner workings of the official LEGO Color sensor.
He took to it with a knife to explore the insides and how it works.
I won't spoil it, but there is a fantastic little twist at the end so read the whole thing :)

via BotBench - http://botbench.com/blog/2011/09/16/exposed-lego-colour-sensor/
He took to it with a knife to explore the insides and how it works.
I won't spoil it, but there is a fantastic little twist at the end so read the whole thing :)
via BotBench - http://botbench.com/blog/2011/09/16/exposed-lego-colour-sensor/
Friday, September 16, 2011
List of Building Instructions
So you may have see the new section 'Building Instructions' after the blog revamp and have been wondering what it's all about. Well one of the main questions we get from readers is "How do I build that?" Not everything we post has a full set of instructions, (imagine Bazmarc taking the time to do Build Instructions for Wall-E!) but there are certainly quite a few great ones around.
While we certainly encourage people to come up with their own creations (and let us know about them of course). We understand that sometimes you need a little help and inspiration to get them started, hence the creation of this list.
We'd like your help in finding them. Please submit a design for us to look at and if we like it, up it goes on the list!
A few guidelines:
I've started the list with a few of my own, but can't wait to see what else our fantastic readers are able to find as well.
While we certainly encourage people to come up with their own creations (and let us know about them of course). We understand that sometimes you need a little help and inspiration to get them started, hence the creation of this list.
We'd like your help in finding them. Please submit a design for us to look at and if we like it, up it goes on the list!
A few guidelines:
- There needs to be clear building instructions. CAD instructions, photographs, step-by-step video are all fine, as long as it is possible for someone to follow along and build it
- If possible keep as much as possible to the NXT kit. If it needs the odd extra part here and there, that's fine, but we'd like to make sure that people aren't disappointed when they go to build, and find they are missing something
I've started the list with a few of my own, but can't wait to see what else our fantastic readers are able to find as well.
Click here to get started!!!!
*** EDIT: Please submit individual robots rather than sites. If a site has multiple robots, pick out the best two and submit those separately with direct links to them ***
Wednesday, September 14, 2011
Pan and Tilt Time Lapse rig
A very nice pan and tilt setup for use with a DSLR Camera.

First video shows how it works and the second video gives a example of what it collected.
via - http://hackedgadgets.com/2011/09/13/lego-pan-tilt-system/

First video shows how it works and the second video gives a example of what it collected.
via - http://hackedgadgets.com/2011/09/13/lego-pan-tilt-system/
Tuesday, September 13, 2011
More software: ROBOTC 3.0 is Here!

Xander made a nice post on his all new website, about the New RobotC 3.0 release. Many of you might know him as the creator of the driver suite for all the new (non LEGO) sensors in the RobotC platform.
The new RobotC has many improvements, including an virtual test landscape.
But that’s not all! Xander has 75 ROBOTC 3.0 annual single-seat licenses for the Mindstorms NXT platform to give away! (read the full article and instructions for requesting a license here.
Martyn
Sunday, September 11, 2011
LEGO® MINDSTORMS Mac Software Available Online

Have a look here.
Friday, September 2, 2011
LEGO® MINDSTORMS featured in Megafactories
Megafactories, the TV channel of National Geographics in the United Kingdom, features a small footage on LEGO® MINDSTORMS that was filmed at LEGOWORLD 2010 in Zwolle:
Thanks, Laurens, for uploading the video.
Thanks, Laurens, for uploading the video.
Subscribe to:
Comments (Atom)